OFX, QIF and OFC
Keeping your accounts accurate and up-to-date is essential, and the app makes it easy by allowing you to import transactions directly from your bank. Using supported file formats like OFX, OFC, or QIF, you can quickly upload transaction data, minimizing manual data entry while ensuring your financial records are synchronized.
Some banks may not fully adhere to the OFX, QIF, or OFC specifications, which can cause issues during import. If you encounter any problems, please reach out to us at support@beyondbudget.net with the file in question, and our team will work on improving compatibility.
Steps to Import Transactions:
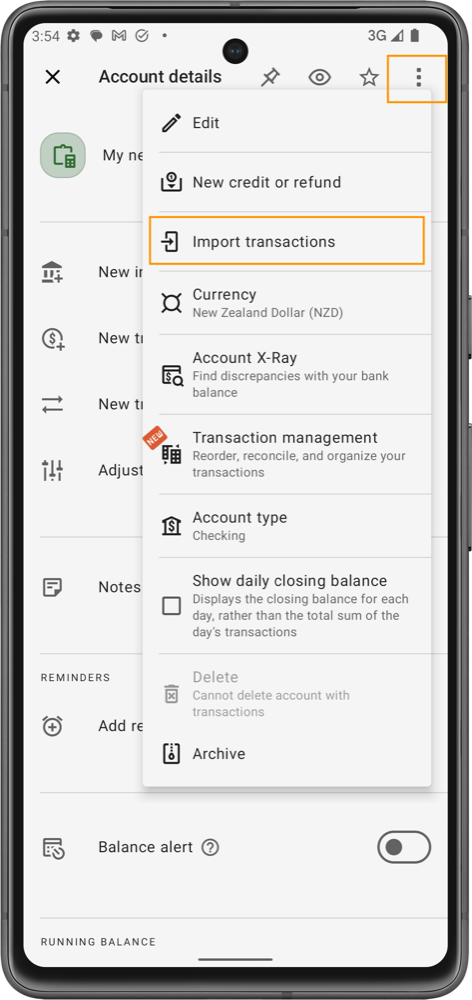
- Open the Account Details:
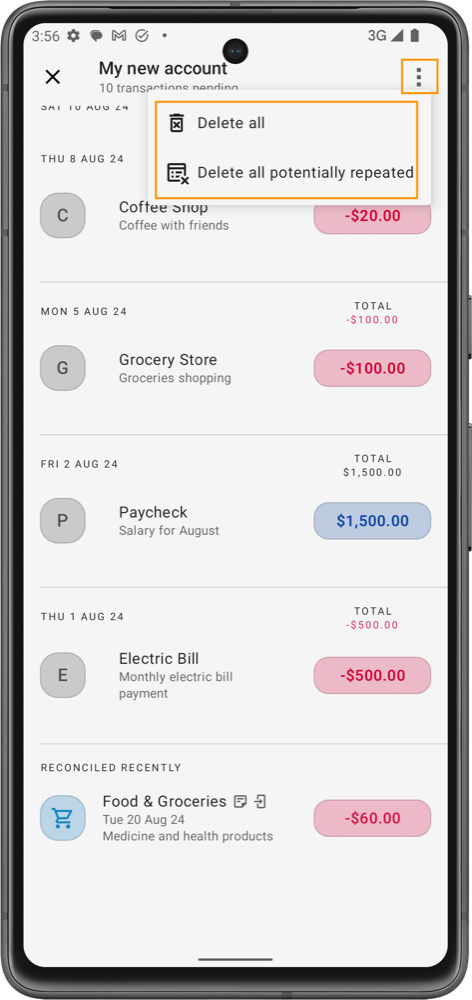
- Begin by navigating to the Account Details screen of the account you want to update. Tap the three-dot menu icon located in the top-right corner of the screen to access the account options.
- Select "Import Transactions":
- From the dropdown menu, select the Import Transactions option. This will open the import tool, which allows you to upload your bank transactions directly from a file on your device or via email.
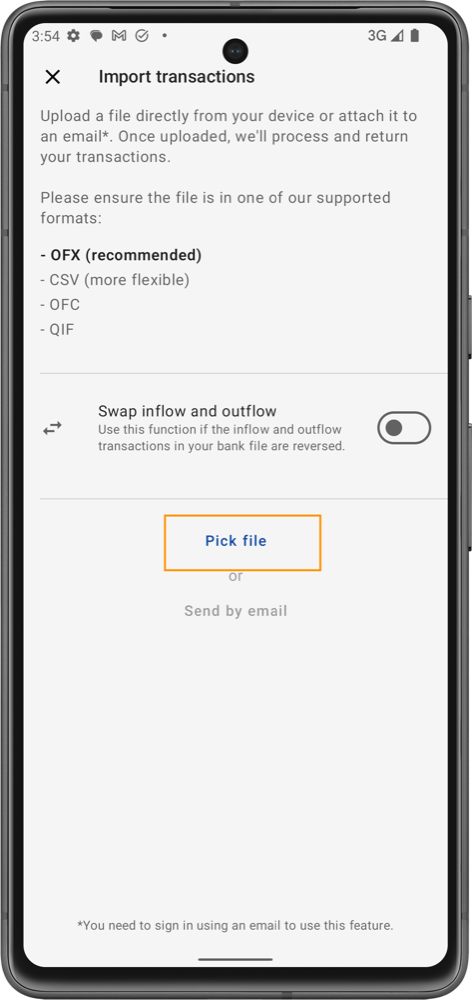
- Choose the Right File Format:
- Ensure that the transaction file you’re uploading is in a compatible format. The app supports several formats:
- OFX (Open Financial Exchange) – Recommended due to its widespread use by financial institutions and its ability to carry detailed transaction data.
- CSV (Comma-Separated Values) – Provides flexibility, but may require careful formatting.
- OFC (Open Financial Connectivity) – Another widely used format for financial data exchanges.
- QIF (Quicken Interchange Format) – Commonly used by Quicken and other financial software.
- Ensure that the transaction file you’re uploading is in a compatible format. The app supports several formats:
- Upload the File:
- Click on Pick File to browse for the file on your device. Simply attach the file to an email and send it to the provided email address, and the app will automatically process the attached file.
- Swap Inflow and Outflow (Optional):
- If you notice that your income and expense entries are reversed (for example, income is recorded as an expense and vice versa), toggle the Swap Inflow and Outflow option. This setting corrects any discrepancies in how inflows (income) and outflows (expenses) are labeled in the imported file.
- Process the File:
- Once you’ve selected your file, the app will start processing the transactions. This step may take a moment depending on the size of the file and the number of transactions being imported. The app will automatically integrate the transactions into your account, saving you time and reducing the chance of errors that can occur with manual entry.
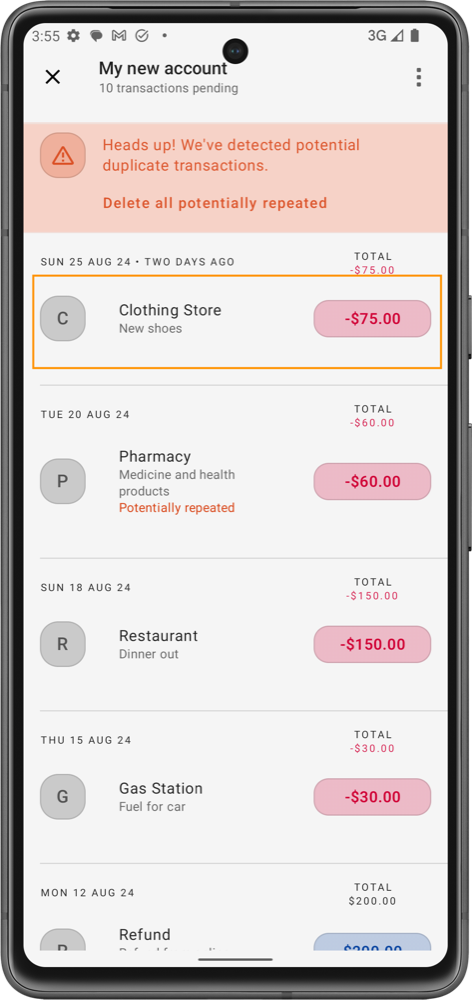
- Handling Duplicate Transactions:
- After the transactions are processed, the app checks for potential duplicates. If duplicates are detected, you’ll receive a notification warning you of the issue. The app gives you two options:
- Delete All Potentially Repeated Transactions: This will remove all duplicate transactions automatically.
- Manual Review: You can choose to go through each flagged transaction one by one to determine if it’s a true duplicate before deleting it.
- After the transactions are processed, the app checks for potential duplicates. If duplicates are detected, you’ll receive a notification warning you of the issue. The app gives you two options:
- Review Imported Transactions:
- Once the import is complete, head back to your account overview to review the new transactions. Ensure they match your bank’s records for accuracy. If you spot any discrepancies, you can manually adjust or delete individual entries as needed.
- Reconciliation:
- After importing your transactions, you may notice that some entries are pending reconciliation. A notification will appear at the top of your account screen indicating how many transactions are yet to be reconciled. Click Reconcile to match these transactions with your bank statement and confirm that everything is aligned.
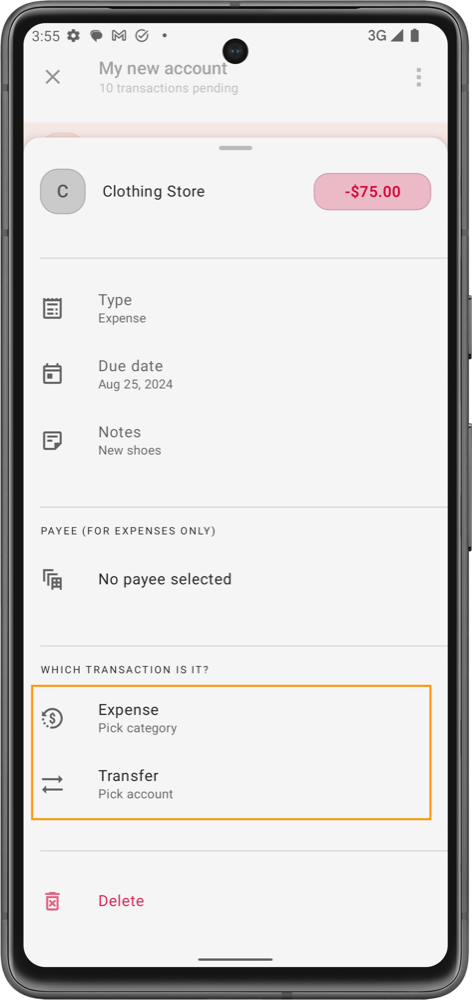
- Depending on the type of transaction you’re importing, you’ll need to select the appropriate destination:
- Expense: If the transaction is an expense, you’ll be prompted to select a category to assign the expense.
- Transfer: For transfers, you’ll need to select the account to which the funds were moved.
- Income/Credit: If the transaction is income or a credit, you’ll be required to choose the account where the funds should be deposited.
- During reconciliation, you can verify whether all imported transactions are correct. Once confirmed, mark them as reconciled, and your account balance will be updated accordingly.
- Adjusting Balances (Optional):
- If there’s a discrepancy between your bank balance and the balance in the app, you can adjust the balance manually. This feature is particularly useful if you’ve missed transactions or if there are minor differences that don’t need to be reconciled through a detailed review. Adjusting the balance will not affect the rest of your budgeting setup.
You can alternatively send the transaction file directly from your desktop to import@beyondbudget.net, and the app will automatically process and import the transactions for you. This is a convenient option if your files are stored on your computer.
Deleting unreconciled transactions
If you decide not to proceed with the imported transactions, you can simply delete all non-reconciled transactions. This will remove them from your account without affecting your budget, ensuring that your financial setup remains unchanged.
Tips for a Smooth Import Experience
- Ensure Accurate File Formatting: Before importing, make sure the transaction data in your file is correctly formatted and matches the supported file types. This will prevent errors during the import process.
- Regular Imports: To stay on top of your finances, consider importing your transactions regularly, such as monthly or biweekly. This keeps your records current and helps you spot potential issues earlier.
By using the transaction import feature, you can maintain an accurate and organized financial record with ease, ensuring your accounts are always aligned with your actual bank statements.
Due to technical limitations with our real-time database, the time period for imported transactions is limited to 12 months, and each file can handle only a few hundred transactions. For larger datasets, consider splitting them into smaller files. We are working on improving this.